 |
 Adopt A Pet Adopt A Pet
Installing This Plugin
|
You will first need to Install the Plug-in, if it is not already installed.
Next, it is important to know that just installing a plug-in does not make it accessible to your website's visitors. Once it has been installed, you will need to go to the Page Editor and 'set it up'. You will need to make it 'active', tell it where you wish the navigation link to display, and assign it the proper 'plug-in'. How to do this is explained below:
Setting Up Your Plugin
 |
 |
|
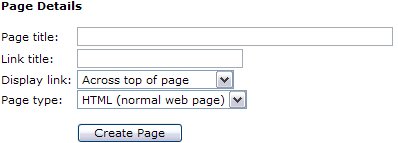
After clicking your Page Editor icon in your Admin Control Panel, you will need to click the text link for a New Page. In this example, we are going to set up the Adopt a Pet plug-in. In the Page title we have inserted the page name. This title is also what will be displayed in your navigation menus. In the Link title we have entered Adopt_a_Pet. Remember, this is the name file that will be created and must be one word. Next decide where you wish the link to display. And finally, since this is a Plug-in, change the Page type from HTML, to Plug-in. Click the Create Page button to continue. |
|

|
 |
To complete the activation of your new Plug-in, you will need to change the Status from Hidden to Active. Next you will need to change the Plug-in to display from the default 'Business Directory' to the 'Adopt a Pet', or whichever Plug-in you are actually installing.
See left example of changes.
Finally select Update Page.
After you have completed these steps, you can return to the Control Panel. You will now be able to see and select the Adopt a Pet icon in your Administrators menu!
|
|
How to Edit Your Adopt A Pet Settings
|
Once you have clicked the Adopt a Pet icon, you will see a menu similar to the one below...
Adopt a Pet Menu

Home |

Settings |

Pets |

Species |
 Settings Settings
This is where you will set up your Adopt A Pet Plugin options, preferences and add any custom text either above of below the categories on the Adopt A Pet Page.
General Settings
As you can see from the options above, and their drop down bars, you have the ability to set whether or not a listing will be automatically added to your site, or if you want to review and approve each listing first. Note: If you prefer to screen all listings for appropriateness prior to activation, you should set 'Action for pre-paid listings' to 'Hold for administrator approval'. Also note that if you enable the 'Allow users to edit listings' feature, your users will be able to completely change the listing details after you approve it. This may defeat the purpose of holding the listing for approval. But will save you the headache of updating a listing each time they notice a typo or need a small adjustment.
Content
This section will allow you the ability to place content using the editor above and/or directly below the categories table on the Adopt a Pet page. This is optional, if you need additional space to provide instructions, an announcement or even to just 'pretty it up' a bit.
Clicking the Edit Text button will allow you access to the editor where you can customize the content to be displayed in these areas. Please see the Page Editor Chapter for further details on using this editor.
 For a complete list of the WYSIWYG Icons and what they do, For a complete list of the WYSIWYG Icons and what they do,
please click here.
|
Managing Pet Listings
|
Pets
Here you can edit any information pertaining to a current listing within the Adopt A Pet Module, or enable/delete a listing awaiting your review. After selecting the above Pets icon, you will see a list of all current pet listings. This includes listing that have not yet been approved. Please note: Only 15 results per page are posted. You can choose from the pages numbered below the list to view more or search for a pet using the search box.
Here you can see the first image of the listing if one was uploaded, the name of the pet, breed, age, gender, their current status (Enabled or Disabled), and finally you are given the ability to Edit  or Delete or Delete  the listing. the listing.

Clicking the Edit link allows you to access the Listing Details section to edit any current information or approve/deactivate the listing. Changing the status from Disabled to Enabled is done easily from from the first option on this page, as you can see in the image to the left.
All details on an ad can be edited in this section by the administrator.
In this section you can also change the expiration date of the listing to allow it a longer running if preferred.
At the bottom of the Pet Listing Details is a button to Update your changes. Click this after changing any information within the ad (including approving the ad if it is being held for review).
|
Managing the Species Categories
|
Species
Adding categories to your Adopt a Pet plugin is a snap! Or should I say 'click'?

Above, you can see a sample list of species (categories) and your options associated with them.
Edits a species (changes it's name).
Deletes a species.
To create a new species, click the New Species text link below the lsit of existing species. Next, simply type in the name of the new species into the field provided and click the Create button.
Note: You can create as many species categories as you wish. Sub-categories are not supported in this module. These would be considered Breeds.
To add a breed to your species category, click on the Breeds link associated with the Species you wish to add/modify. Your plugin already comes with a list of default breeds for each category, but it does not include 100% of every breed available, though the lists is extensive.
Note: The cats and dogs categories have particularly long lists of breeds available. To better help your users find pets when they are browsing by breeds, we have made it so a breed category only displays on the search pages if it has a pet applied to it. This ensures your users will find a pet in each breed category they click and will keep them from getting discouraged by seeing empty categories time and time again.
|
The Adopt A Pet Block
|
 Adopt a Pet Block Adopt a Pet Block
Your Adopt a Pet Plugin comes with a block that automatically gets installed as part of the plugin. This block self updates and displays the first image uploaded to all listings that use a photo. The images rotate out on a timed basis. This functionality cannot be altered in any way. The block code is protected to keep its functionality in an operating order. The wording and block title also cannot be changed. You can access this block and apply it to any pages you want using the Page Editor. You can learn more about applying the block (Titled: Adopt a Pet) in the Page Editor Chapter of this Guide.
Note: The block cannot be created until at least one listing with a photo exists (because there would be nothing to display in the block until then). The block will be created automatically when the first listing with photo is created. Otherwise the block will not be listed in your Blocks list. If you delete the block from your list by accident, it will again be created automatically the next time someone submits a listing with a photo.
|
=====================================================================
 This completes the How to Administer Your Adopt a Pet plugin. This completes the How to Administer Your Adopt a Pet plugin.
Continue below to learn how a user (and yourself) can add a pet to the
Adopt a Pet Plugin.
=====================================================================
Adding a Pet as a User
|
 How a User can Add a Pet How a User can Add a Pet
Now that you know how to Administer your new Adopt a Pet Plugin, it is time to learn how to add a pet so you can help your users, should they have questions.
|

|
In order to add a pet to the Adopt a Pet Plugin, you will need to login to your Control Panel using your username and password. Click on the icon that is circled in this image (Adopt a Pet) under the USER Control Panel (not the Administrators).
This is where you can view all active listings associated with your username and create new listings.
|
|
After clicking the Adopt a Pet icon, if you have no pets listed, you will see text similar to that on the right.
Add/Edit Profile option:
Here you can quickly apply your contact information and other pet adoption details to any new adoption listings you create. This saves you from having to re-type this information for every listing.
Choose your pet's species from the Add a Pet dropdown bar, then click the Add a Pet button to continue adding a pet for adoption.
|

|
Finishing the listing is then as simple as completing an online form.

Please only click the Submit Listing button once when finished creating your listing. Depending on the size of your images you may be uploading, it may take a few minutes to process the listing.
If you already have pet listings associated with your username, clicking the Adopt a Pet icon within the User Control Panel would display much like below:
Here you can see the first image of the listing if one was uploaded, the name of the pet, breed, age, gender, their current status (Enabled or Disabled), and finally you are given the ability to Edit or Delete the listing if the administrator as allowed editing after the listing is approved.
|
|
|