 |
Shopping Cart |
This will make it more convenient for your customers to gather the items they want to purchase and then checkout when they are ready. Payment methods accepted are PayPal for online processing or by mail in payment address for checks or money orders.
What you will learn in this section:
- How to install and apply this plugin to a new page
- How to edit your General Settings
- How to customize the area above and below the shopping categories on the page
- How to add / edit / delete categories
- How to custom field options for your products
- How to add / edit / delete a product
You will first need to Install the Plug-in, if you have not already done so.
Next, it is important to know that just installing a plug-in does not make it accessible to your website's visitors. Once it has been installed, you will need to go to the Page Editor and 'set it up'. You will need to make it 'active', tell it where you wish the navigation link to display, and assign it the proper 'plug-in'. How to do this is explained below:
Setting Up Your Plug-in
NOTE: Do not place HTML in this area!
Only areas which offer the WYSIWYG editor support HTML.
 |
 |
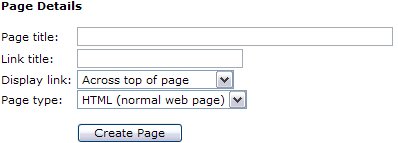
| After clicking your Page Editor icon in your Admin Control Panel, you will need to click the text link for a New Page. In this example, we are going to set up the Shopping Cart plug-in. In the Page title we have inserted the page name. This title is also what will be displayed in your navigation menus. In the Link title we have entered 'Shopping'. Remember, this is the name file that will be created and must be one word. Next decide where you wish the link to display. And finally, since this is a Plug-in, change the Page type from HTML to Plug-in. Click the Create Page button to continue. |
|
|
To complete the activation of your new Plug-in, you will need to change the Status from Hidden to Active. Next you will need to change the Plug-in to display from the default to the 'Shopping Cart', or whichever Plug-in you are actually installing.
See left example of changes.
Finally select Update Page.
After you have completed these steps, you can return to the Control Panel. You will now be able to see and select the Shopping Cart icon in your Administrators menu to set up your categories. The installer does not do this for you. Categories MUST be configured before you can begin to list products.
|
 |
To access your Shopping Cart, you will need to click on the icon that is circled in this image (Shopping Cart).
Once you have clicked the icon, you will see a menu similar to the one below...
|
After clicking on the Shopping Cart you will see the following menu choices:
|

Home |

Settings |

Categories |

Products |

Custom Fields |
 Home Home
This link brings you back to the Control Panel Home.
 Settings Settings
This is where you will set up your Shopping Cart Plugin options, preferences and add any custom text either above of below the categories on the Shopping Cart Page.
Content:

Here you are able to add/edit text above categories, text below categories and add in any sales tax necessary.
Please note: if you choose yes to the Apply Taxes option and you use PayPal you must set the tax rate in your PayPal account settings or the sales tax will not be charged.
Content
This section will allow you the ability to place content using the editor above and/or directly below the categories table on the Adopt a Pet page. This is optional, if you need additional space to provide instructions, or an announcement.
Clicking the Edit Text button will allow you access to the editor where you can customize the content to be displayed in these areas. Please see the Page Editor Chapter for further details on using this editor.
|
 For a complete list of the WYSIWYG Icons and what they do, For a complete list of the WYSIWYG Icons and what they do,
please click here. |
 Categories Categories
In the categories area you will find where you can add, edit or delete a categories.
NOTE: Do not place HTML in this area!
Only areas which offer the editor support HTML.
You must offer at least one category in order to use this plugin.
To add a new shopping category simply type in the name of the Category in the New Category box and click Add. To edit the category name click on the edit
 image. To delete the category name click on the delete image. To delete the category name click on the delete
 image. You can even sort their display order by clicking either the up or down arrows to change thier position in ths list. image. You can even sort their display order by clicking either the up or down arrows to change thier position in ths list.
Custom Fields
If you are selling tangible products, you may find it necessary to set up custom fields for your products. This can be things like size and color options.
To add a custom field option, click the link titled 'Add a new field'.
Now you need to complete the short form to specify what options you have to offer:

You need to first select what type of entry you wish them to make. Use the dropdown bar for Field Type to select from the following options:
Text Entry: This will give the User a text box to type in their specification. For example, this option might be used to collect a name or birthday for an item that is to be personalized.
Multiple Choice (choose one only): This will give the User a several options to choose from about the product they are selecting. It will only allow one option to be chosen. This is perfect for specifing sizes such as small, medium, large.
Multiple Choice (choose several): This will give the User a several options to choose from about the product they are selecting. This option will allow the user to select more than one of the choices offered.
Next you need to fill in the Field Title. This should explain to the usre what they are expected to do with the option provided, such as select a size, specifiy a name or select a color choice.
Click the Save button when you have finished completeing this form. If you have chosen one of the Multiple Choice options, you will now be able to go back and add your choices.
| Name |
Type |
|
| Select a color |
Singlelist |

 |
Click the
Edit icon to configure your color choice, etc.

Type in your choices in the Options fields as shown in the image above. Make sure you place your choices only one per line. Click the Save button when you have finished completeing this form.
Repeat the above steps to add additional Cutom Fields you may be offering with your products. You will be given the option to assign any of the Custom Field options you have created on a per product basis during product creation so you need not worry about the choices being offered when you do not wish.
 Products: Products:
In the products section you are able to add all the products for customers to purchase.
Sample Product:
Here you are able to Add Products into the shopping cart, edit a product with the edit
or delete a product with the delete
image.
To add a product click on the Add Product link. You will then see the following form which will be used to add your product.
NOTE: Do not place HTML in this area!
Only areas which offer the editor support HTML.
 |
This form is where you will put all of the details about your product for sale:
Product Name
Description
Current Price
Regular Price
Shipping Cost
Shipping required - yes or no dropdown option
Custom Fields
You can list one product under three different categories by selecting from the dropdown options.
Then you are able to upload an image of the product or any image you choose to accompany this product. To upload an image, you will need to have the image saved on your computer. You will use the 'Browse' button shown to the left to search your computer's hard-drive for the image you wish to upload. Click the image file to select it.
Now the path to that image will display in the image field and upon clicking the 'Submit Product' button, your product with image should be configured to your products. |
Your customers can then browse your shopping cart page to make their purchases online. If you offer PayPal or 2Checkout in your Payment Settings, they can pay for their item right then. If you offer only a mailing address, they are invited to print a purchase order to mail in with their payment. You will also be sent an email advising you to expect their payment via regular mail so you can have their item ready.
Close this window to return to the Guide.
|

