Next, it is important to know that just installing a plug-in does not make it accessible to your website's visitors. Once it has been installed, you will need to go to the Page Editor and 'set it up'. You will need to make it 'active', tell it where you wish the navigation link to display, and assign it the proper 'plug-in'. How to do this is explained below:
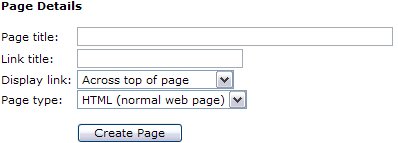
After clicking your Page Editor icon in your Admin Control Panel, you will need to click the text link for a New Page. In this example, we are going to set up the Photo Gallery plug-in. In the Page title we have inserted the page name. This title is also what will be displayed in your navigation menus. In the Link title we have entered Photo_Gallery. Remember, this is the name file that will be created and must be one word. Next decide where you wish the link to display. And finally, since this is a Plug-in, change the Page type from HTML, to Plug-in. Click the Create Page button to continue.
In order to access and edit your Photo Gallery module, you will want to login to your Control Panel using your administration username and password. Click on the icon that is circled in this image (Photo Gallery).
Once you have clicked the icon circled, you will see a menu similar to the one below...
Photo Gallery Menu
Home
Settings
Photos & Categories
Home
This link brings you back to the Control Panel Home.
Settings This is where you will set up your photo gallery options and add any custom text either above of below the categories listing.
General Settings
Number of images across:
Number of images tall:
Thumbnail maximum width:
px
Thumbnail maximum height:
px
Image maximum width:
px
Image maximum height:
px
Disable browser context menu:
Sort photos:
As you can see from the options above, and their drop down bars, you have the a lot of control over how your photo gallery plugin will layout.
Click the Update Settings button after setting preferences.
This section will allow you, the admin, the ability to place a small amount of text either above or below the categories table on the Photo Gallery page. This is an option if you need additional space to provide instructions, or an announcement.
When you change the text above or below the categories you will see the following:
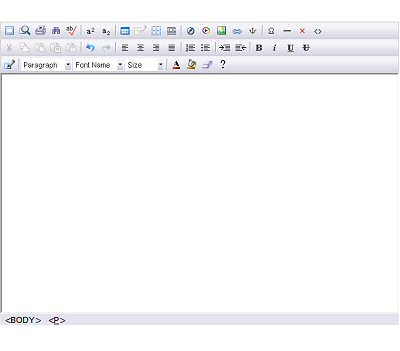
How to use this Editor is explained in the Page Editor chapter of our guide.
For a complete list of the WYSIWYG Icons and what they do,
please click here.
Photos and Categories Here you upload photos directly to your Photo Gallery page or create categories to better manage your photos into groups. Upon clicking the Photos & Categories icon, you will see the option to create a catgory for your images:
New category:
OR
The manage photos option if you choose to upload images directly without sorting them by categories:
0 photos are in this category.
If you chose to go right to uploading photos without sorting by category, click the Manage Photos button as shown above and skip the below section about creating categories.
Categories
Adding categories is quite easy and is done by simply typing in the name of the category you wish to create and clicking the 'Add' button.
New category:
Once your category is created, you will see it listed in the Categories section. It will look much like this initially:
Holiday Parade
Edit icon: Allows you to rename this category or choose one of the uploaded images as a thumbnail preview for the category.
Delete icon: Clicking this will remove the category permenantly.
Clicking either the category name or the empty thumbnail preview will allow you to create subcategories for this category if needed or directly begin to upload images into the newly created category by clicking the Manage Photos button as seen below.
0 photos are in this category.
Once you have one or more images uploaded into this category, you will be able to come back to the 'Photos & Categories' area and edit the category to assign an image as the Thumbnail Preview image. To do this, click the
'Edit' icon next to the category you wish to assign a thumbnail to. Next you can use the dropdown bar next to the Thumb field in order to select one of your images. Titling each images when uploading them will make this selection process easier.
Clicking either the category name or the empty thumbnail preview will allow you to begin uploading images into the newly created category by clicking the Manage Photos button as seen below.
0 photos are in this category.
The Add Photo area looks like the one below when you first are getting started with no images yet uploaded:
Clicking the Browse button will allow you to search your computers hard drive for an image you wish to add to your Photo Gallery.
Ensure the images your are uploading are valid web-supported images files. These only include .jpg, .gif and .png images. All other formats will be rejected. Also images must be smaller than 2 megs in size.
Try to avoid uploading images directly from your digital camera or the sizes will be so extreme they will eat up your hosting account bandwidth quickly! Instead save them from your camera to your computer and use a graphics program to make them more web-friendly by reducing their resolution and pixel sizes.
Try to give each image a title and a nice description to help your visitor better understand the image and to enhance their experience while enjoying your images.
The Sort Priority field is a "weight" value. Example: If you enter 0 for image A, 2 for image B, and 1 for image C, it'll display them in the order: A, C, B. If you prefer to leave this at the default you can come back later and sort all images by number at one time using the
option. This option will not display until at least one image has been uploaded.
The Status option will either make the photo visible in your gallery for users to view or hide it from users until it is again re-enabled.
Click the Upload Photo button after completeing all fields. Repeat this proceedure for each image you wish to upload.
Click here to see an example of a Photo Gallery on a live website.


 For a complete list of the WYSIWYG Icons and what they do,