 |
 |
Local Jobs |
The Local Jobs Plug-in is an add-on feature you can choose to install to your site. It is a jobs directory where visitors to your site can post job openings, or browse job opening ads. This plug-in does not support any type of payment or accounting. It is meant to be a free service. If you choose to make it a paid service, that is fine, but you will need to do this on your own, as support for this is not considered part of your Membership.
What you will learn in this section:
- How install and apply your plugin to a new page
- How to add/edit/delete categories to your plugin
- How to customize the area above and below the categories on the page
- How to edit/approve/delete existing listings created by your users
- How to add a new listing
You will first need to Install the Plug-in, if you have not already done so.
Next, it is important to know that just installing a plug-in does not make it accessible to your website's visitors. Once it has been installed, you will need to go to the Page Editor and 'set it up'. You will need to make it 'active', tell it where you wish the navigation link to display, and assign it the proper 'plug-in'. How to do this is explained below:
Setting Up Your Plug-in
 |
 |
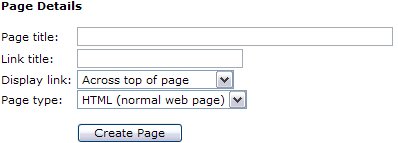
| After clicking your Page Editor icon in your Admin Control Panel, you will need to click the text link for a New Page. In this example, we are going to set up the Local Jobs plug-in. In the Page title we have inserted the page name. This title is also what will be displayed in your navigation menus. In the Link title we have entered Jobs. Remember, this is the name file that will be created and must be one word. Next decide where you wish the link to display. And finally, since this is a Plug-in, change the Page type from HTML, to Plug-in. Click the Create Page button to continue. |
|
|
To complete the activation of your new Plug-in, you will need to change the Status from Hidden to Active. Next you will need to change the Plug-in to display from the default 'Business Directory' to the 'Local Jobs', or whichever Plug-in you are actually installing.
See left example of changes.
Finally select Update Page.
|
After you have completed the above steps, you will now be able to see and select the Local Jobs icon in your Administrators menu to set up your categories. You will see the follwing menu icons:
 Home Home
This link brings you back to the Control Panel home.
 Settings Settings
This is where you will set up your local jobs categories and approve any ads your users may submit.
Categories MUST be configured before anyone can post a job opening. The installer does not do this for you.
|
To create new categories, click the [New Category] link. Enter a category name and click the Add button. You will get a 'Category created successfully' message. Click Return to continue. Continue this process until you have all the categories you wish.
As you can see, you can also Rename or Delete current categories easily, if needed. |
 |
|
 Text Text
This section will allow you, the admin, the ability to place a small amount of text either above or directly below the categories table on the Local Jobs page. This is optional, if you need additional space to provide instructions, or an announcement. Click the Edit Text button to edit either area.
When you change the text above or below the categories you will see the following:
This is what your editor looks like. You can highlight and delete the current text displaying there by clicking and holding down your right mouse button and dragging it over the words Add your content here. And then clicking the Backspace button on your keyboard. Now you are ready to create your own text!
Please see the Page Editor Chapter for further details on using this editor.
|
 For a complete list of the WYSIWYG Icons and what they do, For a complete list of the WYSIWYG Icons and what they do,
please click here. |
How to Approve or Edit Job Listings:
Login to your Admin Control Panel and select the Local Jobs icon. This is where you will come to approve any ads your users may submit.
You will be sent an email each time a new ad is submitted for review. All jobs must be reviewed and Approved before they will be in the Jobs database for visitors to browse. Ads awaiting approval are found in this section. Simply click either the Approve or the Delete links to manage the awaiting ads.
PLEASE NOTE: The ads in this Jobs Directory will automatically remove themselves upon expiration.
To edit an already approved listing, ensure that you are logged in as the admin of your site. Click on the Local Jobs link from your homepage (or where ever a user might access the jobs listing page you created). Navigate your way to the job listing you wish to edit and click on the listing. You will now see an edit link in the lower right hand corner of the ad.
How to Add a New Listing as a User:
This is one of the very few areas of your site that will allow a user to submit information without first being registered and logged in. Creating a new ad for a local job will be done from the page you created on which your plugin displays.
 |
When a user is visiting your local jobs page, they can click the link as circled to the left which says [Post a Help Wanted Ad].
This will bring them to a short form to complete and submit with their ad details.
You will be sent an email each time a new ad is submitted for review. All jobs must be reviewed and Approved before they will be in the Jobs database for other visitors to browse. |
|
|
