This is a very strong plugin add-on that will greatly enhance your new website. Listings are automatically deleted upon expiration to ease your administration tasks. Please keep in mind, though strong in features, this module is an add-on and meant to be utilized by the general public visiting your site (For Sale By Owner types). It is not intended to be a replacement for the local auto dealers in your area. Dealers are welcome to list their ads if they wish.
Suggestions for improvements to this plugin can be made here:
Next, it is important to know that just installing a plug-in does not make it accessible to your website's visitors. Once it has been installed, you will need to go to the Page Editor and 'set it up'. You will need to make it 'active', tell it where you wish the navigation link to display, and assign it the proper 'plug-in'. How to do this is explained below:
Setting Up Your Plugin
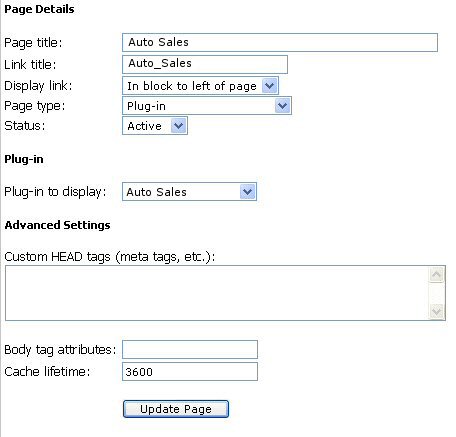
After clicking your Page Editor icon in your Admin Control Panel, you will need to click the text link for a New Page. In this example, we are going to set up the Auto Sales plug-in. In the Page title we have inserted the page name. This title is also what will be displayed in your navigation menus. In the Link title we have entered Auto Sales. Remember, this is the name file that will be created and must be one word. Next decide where you wish the link to display. And finally, since this is a Plug-in, change the Page type from HTML, to Plug-in. Click the Create Page button to continue.
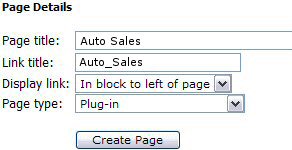
To complete the activation of your new Plug-in, you will need to change the Status from Hidden to Active. Next, you will need to change the Plug-in to display from the default 'Business Directory' to the 'Auto Sales', or whichever Plug-in you are actually installing.
See left example of changes.
Finally, select Update Page.
After you have completed these steps, you can return to the Control Panel. You will now be able to see and select the Auto Sales icon in your Administrators menu!
Settings This is where you will set up your Auto Sales Plugin options, preferences and add any custom text either above of below the categories on the Auto Sales Page.
General Settings
Action for pre-paid listings:
Allow users to edit their listings:
Maximum number of photos allowed:
Price
Weekly listing:
$
As you can see from the options above, and their drop down bars, you have the ability to set whether or not a listing will be automatically added to your site, or if you want to review and approve each listing first. Note: If you prefer to screen all listings for appropriateness prior to activation, you should set 'Action for pre-paid listings' to 'Hold for administrator approval'. Also note that if you enable the 'Allow users to edit listings' feature, your users will be able to completely change the listing details after you approve it. This may defeat the purpose of holding the listing for approval. But will save you the headache of updating a listing each time they notice a typo or need a small adjustment.
Buy of the Week:
Buy of the Week
Buy of the week:
This allows you to feature an ad on the Auto Sales page. This will display directly below your categories. To select an ad, simple use the drop down bar to find the ad title of the one you wish to have featured. Selecting "None" will remove a current selection and have no ads featured on your page.
Content This section will allow you the ability to place content using the editor above and/or directly below the categories table on the Auto Sales page. This is optional, if you need additional space to provide instructions, or an announcement.
When selecting the 'Edit Text' button for either above or below the categories, you will be viewing the WYSIWYG Editor tool.
How to use this Editor is explained in the Page Editor chapter of our guide.
For a complete list of the WYSIWYG Icons and what they do,
please click here.
Managing Auto Listings
Listings
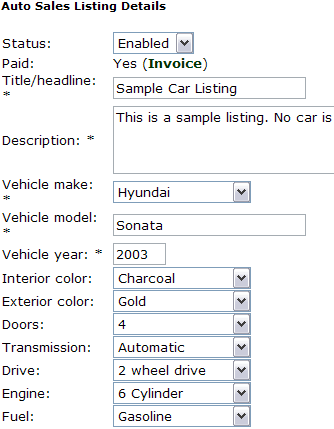
Here you can edit any information pertaining to a current listing within the Auto Sales Module, or enable/delete a listing awaiting your review. After selecting the above Listings icon, you will see a list of all current listings. This includes listing that have not yet been paid or approved. Please note: Only 15 results per page are posted. You can choose from the pages numbered below the list to view more. Here you can see the first image of the listing if one was uploaded, the listing title, Price, any contact info, their current status (Awaiting Approval or Active), and finally you are given the ability to Edit or Delete the listing.
Clicking the Edit link allows you to access the Listing Details section to edit any current information or approve/deactivate the listing.
Changing the status from Disabled to Enabled is easy from from the first option on this page, as you can see in the image to the left.
Note: If a listing has not been paid for, you cannot enable it until the invoice is paid.
You can mark an invoice 'Paid' if it has not yet been done, by clicking the 'Invoice' link (next to Paid: No) and clicking 'Mark as paid'.
All details on an ad can be edited in this section by the administrator.
In this section you can also change the expiration date of the listing to allow it a longer running if preferred.
At the bottom of the Auto Sales Listing Details is a button to Update your changes. Click this after changing any information within the ad (including approving the ad if it is being held for review).
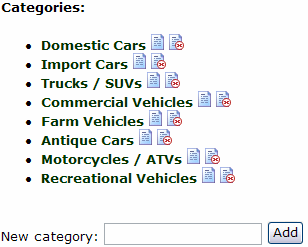
Adding/Editing Categories
Categories Adding categories to your Auto Sales module is a snap! Or should I say 'click'?
To the left, you can see a sample list of categories and your options associated with them.
Edits a category (changes it's name). Deletes a category.
And to create a new category, simply type in the name of the new category into the field below the existing categories and click the Add button.
Note: You can create as many categories as you wish. Sub-categories are not supported in this module.
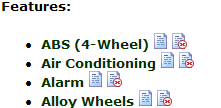
Adding/Editing Features
Features If you wish to add features to the available features list to help expedite the listing process for the user, you can do that here.
First you will see a list of all current features.
Edits a feature (changes it's name). Deletes a feature.
Below the lists, you are given the ability to add new features.
Simply type in the name of the new feature as you wish it to appear. Click the 'Add' button to finish. Add as many features as you wish. They will display alphabetically and as check boxes to easily allow the user to add these features to their Auto Sales listing.
The Auto Sales Block
Auto Sales Block
Your Auto Sales Module comes with a block that automatically gets installed as part of the plugin. This block self updates and displays the first image uploaded to all listings that use a photo. The images rotate out on a timed basis. This functionality cannot be altered in any way. The block code is protected to keep its functionality in an operating order. The wording and block title also cannot be changed. You can access this block and apply it to any pages you want using the Page Editor. You can learn more about applying the block (Titled: Auto Sales Listings) in the Page Editor Chapter of this Guide.
Note: The block cannot be created until at least one listing with a photo exists (because there would be nothing to display in the block until then). The block will be created automatically when the first listing with photo is created. Otherwise the block will not be listed in your Blocks list.
Adding An Auto Listing as a User
Now that you know how to Administer your new Auto Sales Module, it is time to learn how to add a listing so you can help your users, should they have questions.
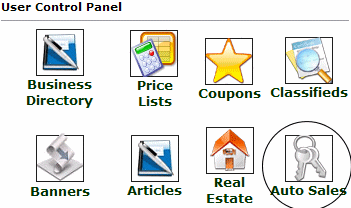
In order to add a listing to the Auto Sales module, you will need to login to your Control Panel using your username and password. Click on the icon that is circled in this image (Auto Sales) under the USER Control Panel (not the Administrators!). This is where you can view all active listings associated with your username and create new listings.
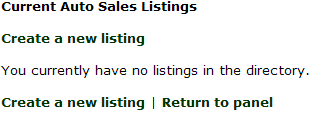
After clicking the Auto Sales icon, if you have no listings currently advertised, you will see text similar to that on the right.
Add/Edit Profile option: Allows users to quickly apply their contact information and other listing details to any auto listings they create. This saves them from having to re-type this information for every listing.
Clicking the 'Create a new listing' link will get you started.
Adding the listing is then as simple as completing an online form. Required Fields are marked with an asterisk (*). Please only click the Submit button once when finished creating your listing. Depending on the size of your images you may be uploading, it may take a few minutes to process the listing.
Upon clicking Submit, you are brought to the Invoice Details, letting you know if any fees are owed. Clicking Return will return you to the User Control Panel.
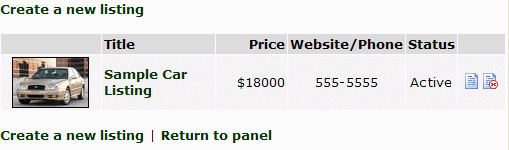
If you already have listings associated with your username, clicking the Auto Sales icon within the User Control Panel would display much like below:
As you can see, a thumb nail image of the first photo uploaded to the listing is displayed along with the listing Title, Price, a method of contact and the current status of the listing. You are also given the ability to Edit or Delete the listing.
When the ad has expired, the user will receive email notification with a link to renew the listing any time in the next 30 days.
If they do nothing (choose to not renew their ad) the ad will be deleted permanently from your site. You as the admin, will also receive a copy of this email for your records.
 Auto Sales
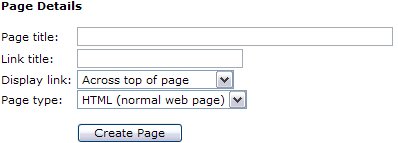

 For a complete list of the WYSIWYG Icons and what they do,